Why & how to make a personal website
Why bother?
The main goal of social media is convenience. You don’t need to worry about the technical details, and you don’t need to worry about the layout of the page. All you need to do is find something to post and hope it makes its way to people who are interested in it. This sounds good in theory. But, when flipping these statements, it becomes clear that there is a loss that comes with this convenience. You do not fully know how the social media you use works. Even if you have some understanding, there are still parts that are intentionally hidden from you, such as how the algorithm ranks what posts to show you and what posts get you falsely marked as a spammer. You cannot control the layout of your own profile. God forbid you want your cool art to not be so compressed and ugly!
Convenience comes with a cost. Social media makes it seem as if the only choice is convenience and control from their servers. But, if you have your own website, it is truly yours. You can have a kitty follow your cursor. You can make the background bright purple. You can post anything you want, and you will never have to worry about filtering yourself. You can be wildly inconsistent, posting pictures from a Spain visit one day and drawings of snails the next. There is no obligation to post anything at any sort of regular frequency.
And, yes, almost certainly, less people will see your work on a site rather than a social media platform. Strangely, this ends up being a good thing. When you cannot imagine an audience, you express yourself more freely. Chances are that the people who visit your site will show true interest in what you post (which is helped by the fact that the main readers of your site will probably be your existing friends). Shitty spam bot comments will either go away or be replaced with paragraph long emails about a single sentence or picture that especially stood out to a visitor. Perhaps someone will send you their own site, and you will get to learn how they think and express themselves. Making a site is simply a more deliberate and enjoyable process that will teach you a little bit about how the Internet works and how you want to express yourself.
Does this sound appealing to you? Try making a site of your own! You don’t need to pay a cent to start, and you can keep it as simple as you want.
How this guide was written
This guide is very long. Please do not let this intimidate you. I wrote this figuring that different people will have different pieces of knowledge. It is very possible that you will be able to skip over half of this guide. I focused on breadth rather than depth in this guide to make sure as many topics were covered as possible. If something is not covered in depth, I have provided resources. The main goal of this guide is to give you options and surface level understanding of every piece of the process, and the resources to learn more about what you need later.
If a term is underlined in blue like this,Hi!! you can hover over it to see a definition or explanation for it.
Step 1: Decide on the purpose of the website
Before anything else, you should first decide on the motive on the site. Do you want to post your pictures, or write articles, or post book reviews? Would you like to focus on aesthetics above all else, or do you want a website to show new friends so they can learn too much about you too quickly? Do you want to do everything under the sun? Do what you want without shame. Just have a rough idea of what it is you want to do, or you may change your mind on details five times more than you would have later!
There is one more important decision you can make in this stage too: How much do you plan to update your website? You don’t need to have a clear answer to this, but a rough answer would certainly be helpful. The answer to this may influence your technical decisions later and how much you care to invest into your site. I would also like to point out that there is a certain pressure for public-facing works to be continuously updated and improved on. Do not fall into this pressure. You can make a website for one single story that will never be changed, or you can make a shrine website dedicated to the best munchkin cat of the year, or you can make a website with posts spaced three months apart. It is your choice!
Step 2: Make the website itself
There are many options here! But, no matter what you choose, you will be needing some amount of HTML and CSS knowledge. A crash tutorial to these can be found at the end of this section.
- You may want to make everything from scratch. I would argue that this is the most enjoyable way.
- You may want to use a pre-existing base, and simply edit the styling of that. Or you may just want to learn how to make your own site from scratch by studying a base! Templates can be found or generated here, or here, or here.
- If you already program, you may just want to jump straight to something cooler. You can use Hugo or Jekyll to define parts of your website that can be re-used across pages. These are best used on sites that are meant to be frequently updated - what is the point of sinking time into templates that will only be used once?
A crash tutorial to HTML & CSS
Do note that this is not a thorough guide by any means! It is meant to expose you just enough so you are not totally lost when jumping to other resources. Many links to other guides of HTML/CSS are included within this section.
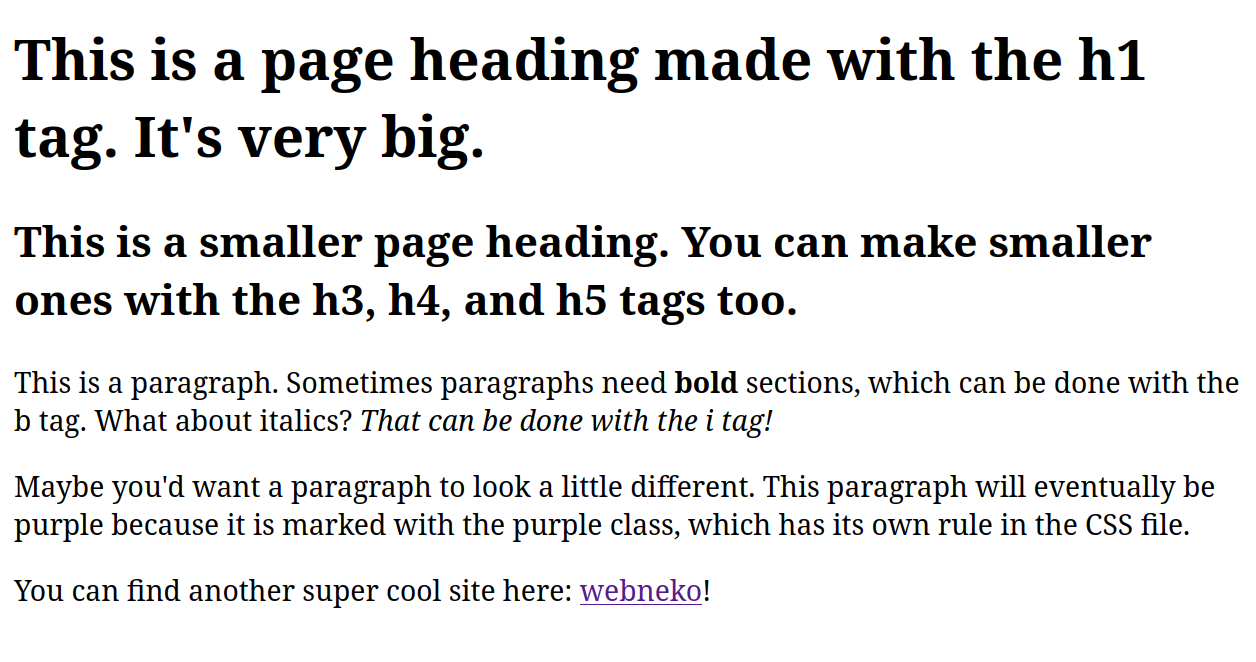
We will start with a bare bones example. Crack open a text editor (like Notepad on Windows) and make two files named index.html & style.css. HTML files hold the content and organization of a site, and CSS files hold the styling information. These are the absolute most basic files that you will use to make your site. A sample index page is below. You can refer to the comments within it to understand what each line is doing. If you’d like to see it for yourself, paste it into index.html, and then open it with a web browser.
<!-- you need this doctype marker, or else your page will be put into something strange called quirks mode! -->
<!DOCTYPE html>

<!-- <html> marks the beginning of an HTML document -->
<!-- change lang to whatever language abbreviation you wish. the language is marked to make life easier on screen readers -->
<html lang="en">
	<!-- <head> contains a bunch of boring information, like the title that shows up for search engines and within the tab, the character set, and any linked files-->
	<head>
		<meta charset="UTF-8">
		<title>My awesome website</title>
		<!-- links the stylesheet to the website -->
		<link rel="stylesheet" href="style.css">
	</head>

	<!-- basically all of the real content of your website will go within this body tag -->
	<body>
		<h1>This is a page heading made with the h1 tag. It's very big.</h1>
		<h2>This is a smaller page heading. You can make smaller ones with the h3, h4, and h5 tags too.</h2>
		<p>This is a paragraph. Sometimes paragraphs need <b>bold</b> sections, which can be done with the b tag. What about italics? <i>That can be done with the i tag!</i></p>
		<p class="purple">Maybe you'd want a paragraph to look a little different. This paragraph will eventually be purple because it is marked with the purple class, which has its own rule in the CSS file.</p>
		 <!-- <a href="link"> lets you create links out to other websites-->
		<p>You can find another super cool site here: <a href="https://webneko.net/">webneko</a>!</p>
	</body>
</html>
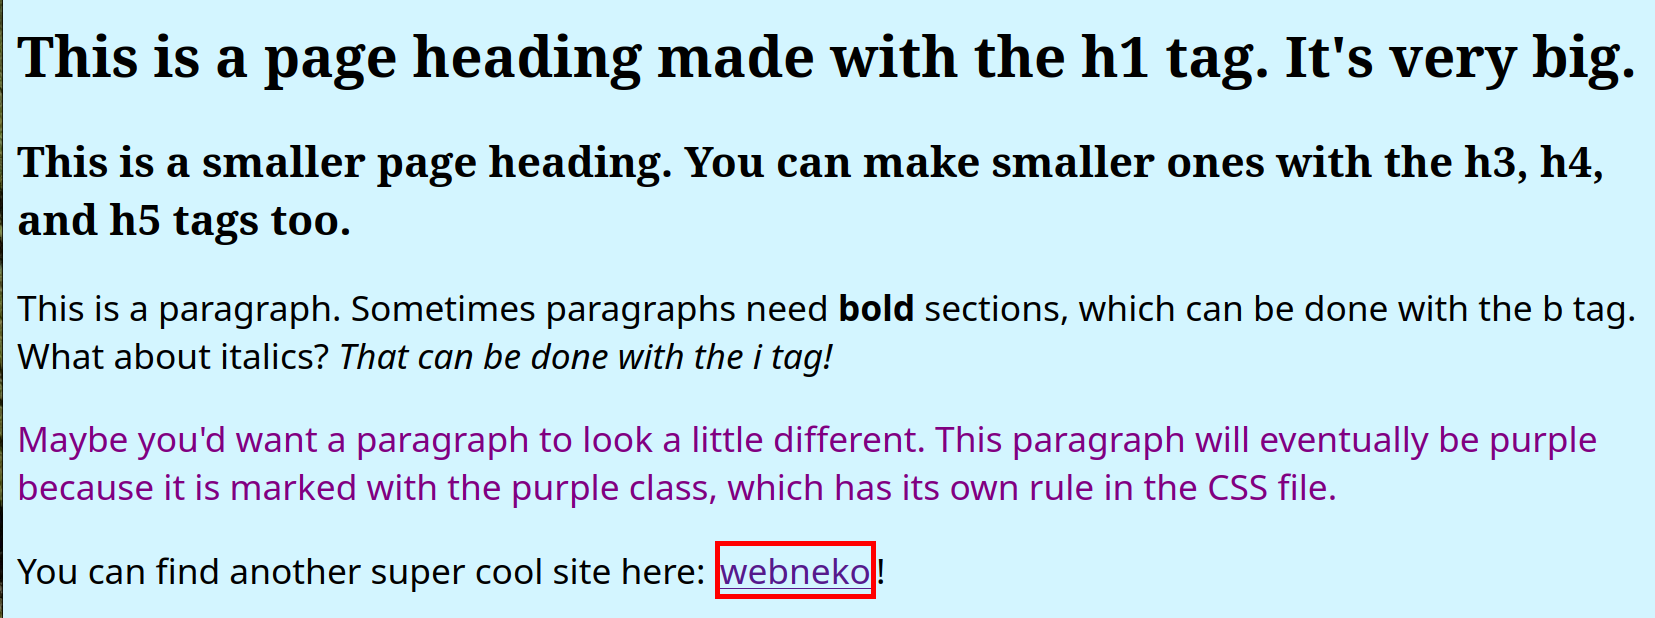
Assuming that style.css is blank, the website would look about like this:
Hopefully this makes HTML look less intimidating. It isn’t too bad! Any term in angle brackets are called tags. Tags are opened with <tag_name>, and closed with </tag_name>. Any elements or text in between the tags have the properties of that tag applied to them. The most basic tags are listed below:
<h1>- The main header tag. It is the biggest and most prominent out of all header tags.<h2>- Another header tag, which is a bit smaller than<h1>. There is also<h3>,<h4>,<h5>, and<h6>, which you can guess are each smaller than the last.<p>- Basic paragraph text. Most text on your site will probably be within these tags.<b>&<i>- These bold and italicize text respectively.<a href="link_here">- Text within these tags turns into a hyperlink. Replace link_here with whatever text you would like it to link to.<img href="link_here">- This tag shows images. Do note that this tag does not need to be closed.<br>- This tag inserts an empty line. This does not need to be closed.<hr>- This tag inserts a horizontal line. This does not need to be closed, and the line can be styled.<div>- You will see this tag a whole lot if you plan to make a bigger site. This divides sections of the website. The tag itself does nothing until styled.
It is impossible to fully document all tags here. Luckily, Mozilla has made extremely thorough and clear documentation! You can find a more formal beginner tutorial from them here that explains more terminology. Or, if you understand the concept well enough and just want to get to work, you can search any tag to find usage examples and options. For example, if you would like to learn about unordered lists in HTML, you can find documentation for the <ul> element here.
I want styling!
Yeah, the site does look a little bit ugly, doesn’t it? Let’s style it! Open up style.css. If you’d like, you can paste the below into it to get started:
body {
    background-color: #d3f5ff;
}

p {
    font-size: 20px;
    /* this just picks whatever sans-serif font that your system already has installed */
    font-family: sans-serif;
}

/* this is how you select classes: just put a period in front! */
.purple {
    /* note that in CSS, color only refers to font color.*/
    color: purple;
}

a {
    border: 3px solid red;
}
This will make the site look about like this:
You can select any HTML attribute in CSS by simply putting its name. p {properties...} selects the p attribute. If you would like to select classes instead, simply append a period in front of the class name the way it’s done with the purple class.
As you can see, any styling applied to the body applies to the whole page. Because the background color is set to a light blue in the body, the whole page is light blue. You can set anything here - fonts, font colors, margins, and more!
Just to show you a few font properties, I’ve changed the font family and font size for the <p> tag. Importing your own font requires a bit more work. This is the most basic explanation I could find - download a font that you like, and give it a try!
There are literal hundreds of CSS properties. If you look up something you want to do, you will likely be able to find a way to do it. Documentation on CSS properties can also be found within the previously linked Mozilla documentation.
There are a few topics that may not intuitively make sense while looking at documentation, so I will leave you with links to two of them to make your CSS experience a bit better. First, there is the CSS unit situation. There are many more ways to define units of length besides pixels in CSS. In fact, there are nine in total. You can read about it here. Secondly, to make it a bit easier to write CSS rules, you may want to know more ways to select attributes. Maybe you’d only like to apply properties to a class if it’s of a certain base HTML attribute, or maybe you would like to select two or three attributes at once.
I want side panels and navigation and other stuff!
This will require heavy use of the <div> tag. Explaining how to do this is very beyond the scope of this article, but allow me to provide a very brief explanation so you can process a real tutorial for it a bit better:
The <div> tag simply marks a container. Until styles are applied to it, it does nothing! But by applying certain style attributes to <div> tags, you can organize and lay out your content and text. One of the most popular and understandable way of organizing divs is through a layout method called Flexbox. Two guides for Flexbox can be found below:
- https://developer.mozilla.org/en-US/docs/Learn_web_development/Core/CSS_layout/Flexbox
- https://css-tricks.com/snippets/css/a-guide-to-flexbox/
Step 3: Host the website
Now that the site is built (or mostly built), you will simply need to find a place to upload the files and get it on the public Internet. This means more options for you!
The easiest and cheapest way to host a website are to use free website hosting tools. This obviously comes with trade offs. You may not be able to use a custom domain for these, and may be on a subdomain of the main host instead (i.e, instead of being supercoolcats.com, you will be on supercoolcats.neocities.org). You will typically have limited storage, features, or server bandwidth as well. You may want to try out a free service first to see how dedicated you are to your website, and see if these limitations actually impede you in any way. For almost everyone, I believe that one of the free options below will start you off just fine.
- Neocities is an extremely popular free web hosting service meant for personal sites. It includes a social media like feed that allows you to follow and like the websites of other Neocities users, and has its own atmosphere and culture that skews a bit younger.
- Nekoweb is very similar to Neocities.
- If the community aspects do not sound appealing to you, you may enjoy something like GitHub Pages more instead. GitHub Pages will also let you point your page at a custom domain for free.
- Web 1.0 Hosting skews a bit older, has its own community feeling, and offers many more technical features than the first two options.
Simply refer to the documention of the service that you choose. They all keep it simple. You will mostly be uploading files, and you will be up and running!
If you would like more control over your website, you may prefer to start paying for a host from the start. Just as before, there are many options. If you would like to simply upload your files into a reliable paid service, you can try something like DreamHost, Hostinger, or SiteGround. (If you use Porkbun to buy your domain, you can host with them for fairly cheap too! Just note that their webhosting tends to be slow.)
If you would like maximum control over your website, consider setting up the hosting from scratch on a server or VPS.Virtual private server. They're basically mini servers that run on bigger servers shared with other users, but none of the users can access each other's servers. (You can also try and leech off of a friend who already has one - websites don’t take much resources to host!) This is especially useful if you see yourself hosting more than one website, and would like to avoid paying for hosting for each individual site. It is also useful if you have an interest in self hosting other services for yourself. This is the most technical option (and perhaps not very beginner friendly), but it grants you the most flexibility. And, if I may make an editorial note, I will say that this option is simply the most fun. If you would like to take this path, a detailed explanation can be found at the end of this section.
If you are curious: personally, I started on Neocities and used it for about two years before I swapped. I wanted to use my own domain, and for 5 dollars a month, I could either pay Neocities to use my domain or I could just set up my own server. Of course, I chose to set up my own server, and had a lot of fun during the process.
It is at this point that you should probably start considering if you need to purchase a domain or not. If you are using a free service, you may first want to check if they allow you to use a custom domain or not in the first place. Domains are easy to buy and relatively cheap - most can be bought or renewed for under 20 dollars a year. You can purchase domains from Porkbun, Cloudflare, Hover, Namecheap, or dozens more options. Peek around! You will probably want to purchase a domain that includes WHOIS protection. Else, your name, email address, phone number, and more will be easily searchable by your website visitors.
Do note that you may hear of GoDaddy several times over while searching for domain registrars. It is very important that you do not use them. There have been hundreds of stories of GoDaddy purchasing searched domains in order to sell them at huge markups. They are also known to have horrible support. And, if it is important to you, you may want to know that Namecheap booted all Russian users off of its service and forced them to transfer domains soon after the Russia/Ukraine war started, regardless of their views of the war. I personally have been using Porkbun for some time now, and have never had an issue.
I want to kill a nice Friday evening learning how to host on my own!
This option assumes you have some command line experience and Linux experience. If you are considering this option, I recommend that you skim this section before deciding if you are comfortable with it or not. Remember that you can always move to hosting on your own server later as long as you keep a copy of your files on your own device.
First, you’ll need some sort of server. You probably will just want a basic VPS,Virtual private server. They're basically mini servers that run on bigger servers shared with other users, but none of the users can access each other's servers. which can be found for as cheap as 5 dollars a month. Usually, this smallest tier is all you will need to run your website. There are dozens of companies to choose from. You can try Linode, Hetzner, DigitalOcean, OVHcloud, or really anything else that you can find! If you only plan to host your website for the time being, simply buy the cheapest option. Your site will almost certainly not use all the resources of even this option. If you are interested in self hosting other services down the road, note that basically every service will later let you upgrade your server in place without needing to reinstall or redo your setup of anything! Then pick a Linux distro of your choice (pick Debian if you don’t know or care) to put on the server.
Now we just have to install a web server!A web server is the software responsible for delivering websites to users. When a user visits your domain, this software is responsible for sending the HTML files that you have made directly to that user. The rest of this guide will assume that you are using Nginx as your web server and Debian or Ubuntu as your distro. If you would like to try something besides Nginx, you can try Apache or Caddy.
Install Nginx as the web server like so:
sudo apt update
sudo apt install nginx
Once installing Nginx, it will automatically open and run when you reboot the server. You typically do not need to manually start it. If you need to restart or stop it, you can use sudo systemctl restart nginx or sudo systemctl stop nginx respectively.
Chances are that you will have a firewall installed by default. You will need to allow Nginx past the firewall. The command below allows HTTP & HTTPS traffic through Nginx. If you would only like to allow HTTPS traffic, you can replace “Nginx Full” with “Nginx HTTPS”.
sudo ufw allow "Nginx Full"
Now is a good time to check that Nginx launched right. Enter http://YOUR_SERVER_IP into your web browser. If all is well, you will see the default Nginx page, which looks like so:

If nothing shows, chances are that something went wrong. You can check what may have happened with systemctl status nginx. You can then usually quickly fix your issue by searching the error code that shows. If the status of Nginx is okay, but you still can’t see anything, you may have to change the firewall settings on the host of your server. Look up your host for more information on this.
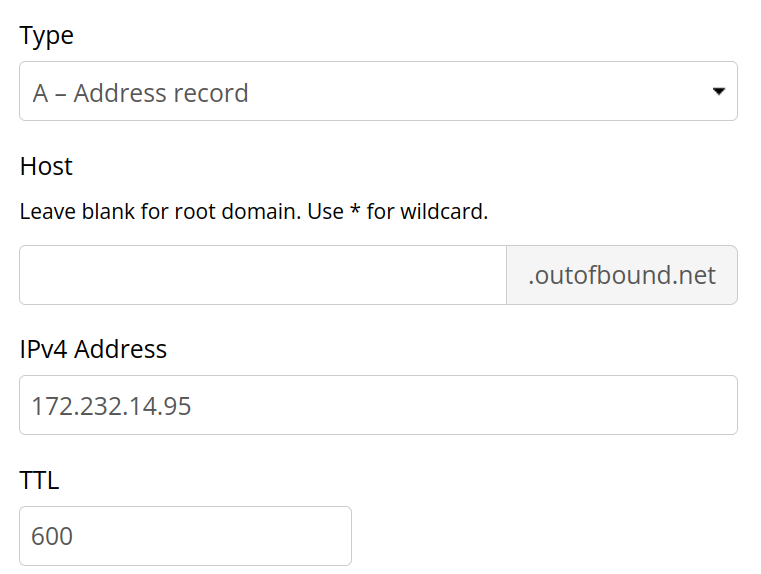
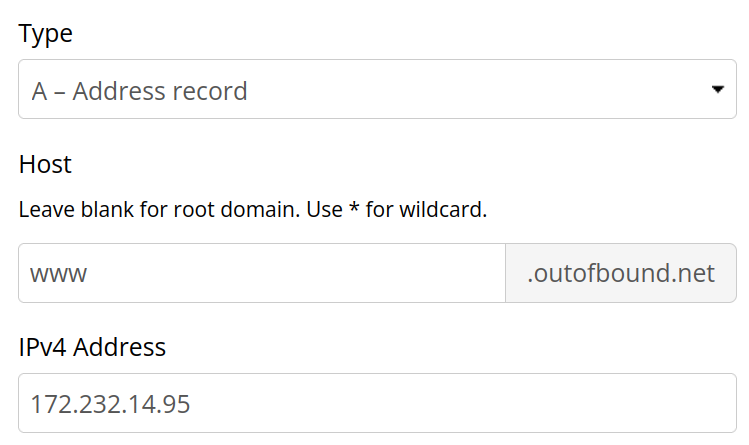
Once that works, it’s time to set up DNS.DNS stands for domain name system. Your server has an IP, and we need to associate your domain with the IP so your browser actually knows what server to pull information from when a user accesses your site. This part is a bit different between different domain registrars, but it is relatively simple. Just login to your domain registrar, locate your URL, find the DNS button, and add a new record. You will be adding two A records.A records are record that connect an IPV4 address to a domain. AAAA records, if you are curious and see it in the drop down, are what connect IPV6 addresses to a domain. The first A record’s host will be your domain, and the IPV4 address will be that of your server. The second A record’s host will be www. and your domain, and the IPV4 address will be the same as before. For example! The first DNS record for Out of Bound looks like so:
And the other looks like so (the only difference is that www is added):
You probably don’t need to worry about TTL.Time to live. This controls how long your DNS record sticks around before DNS servers refresh it. You won't really change your DNS values much, so there's no point in changing the DNS much. This is measured in seconds - with my registrar's default of 600, that means the record will stick around in DNS servers for 10 minutes before being refreshed.
Now we can load your website files into a new directory that Nginx can read! Make a new directory, own it, and make it so anyone can read the file using the below commands, replacing DOMAIN_NAME with your domain:
sudo mkdir -p /var/www/DOMAIN_NAME/html
sudo chown -R $USER:$USER /var/www/DOMAIN_NAME/html
sudo chmod -R 755 /var/www/DOMAIN_NAME
Now you can place your files in /var/www/DOMAIN_NAME/html. How you transfer the files over to your server is up to you. If you’d like a GUI approach, FTP will probably be your best bet, and it will allow you to easily drag and drop files. Follow along with the guide here to set up FTP. If you would prefer the CLI, you can place the files into a git repository and pull it from the server, or transfer the files using the scp or rsync command. The last two commands will require your transfer to be properly set up with SSH. A guide on how to do that can be found here.
Now we have to tell Nginx that your site exists. Run sudo nano /etc/nginx/sites-available/DOMAIN_NAME, and paste in the below:
server {
	listen 80;
	listen [::]:80;

	root /var/www/DOMAIN_NAME/html;

	index index.html index.htm index.nginx-debian.html;

	server_name DOMAIN_NAME www.DOMAIN_NAME;
	location / {
		   try_files $uri $uri/ =404;
	}

}
Afterwards, make a symlink like so:
sudo ln -s /etc/nginx/sites-available/DOMAIN_NAME /etc/nginx/sites-enabled/
Port 80, which we set up Nginx with above, only allows for HTTP traffic. Before setting up HTTPS traffic, we first need to check that the HTTP version of your site works. Navigate to http://YOUR_DOMAIN_NAME in your browser, and see if you can see your site. You will likely have to click past a security warning. Do not worry! This is normal, and will be fixed in the next step! If you cannot access your site, you can try checking for syntax errors in your configuration with sudo nginx -t.
If HTTP works, we can move onto HTTPS. This is how we get rid of the annoying security warning! We will set up certbot, a tool from Let’s Encrypt that issues SSL certificates and does the boring configuration work for you. First install the necessary dependencies and set up a virtual environment for it:
sudo apt install python3 python3-dev python3-venv libaugeas-dev gcc
sudo python3 -m venv /opt/certbot/
sudo /opt/certbot/bin/pip install --upgrade pip
Install & prepare certbot with these two commands:
sudo /opt/certbot/bin/pip install certbot certbot-nginx
sudo ln -s /opt/certbot/bin/certbot /usr/local/bin/certbot
Now we can have certbot automatically edit your previous Nginx config to set up HTTPS by running sudo certbot --nginx. This will walk you through a very basic setup in the CLI. This also automatically redirects people visiting the HTTP version of your site to the HTTPS version.
To make sure your SSL certificate is continuously set up to date and does not expire, you can set up auto renewal with the below command:
echo "0 0,12 * * * root /opt/certbot/bin/python -c 'import random; import time; time.sleep(random.random() * 3600)' && sudo certbot renew -q" | sudo tee -a /etc/crontab > /dev/null
Go to your domain, and see if it works! If so, congrats! You are all done. All you will need to do is occasionally update your server with sudo apt update && sudo apt upgrade, and keep certbot up to date by running sudo /opt/certbot/bin/pip install --upgrade certbot certbot-nginx. If you do both of these monthly, you will be just fine.
And, if you want to see the website that I tested these instructions with, it’s right here!